Showing posts with label MSSQL Admin. Show all posts

Monday, November 23, 2015

Change compatibility level


Using below statements you can change comparability level of  all user databases  with a single click. Comparability level is decided bases on sql server product level.

SQL Server
Comparability Level
SQL Version
SQL 2016
130

SQL 2014
120
12
SQL 2012
110
11
SQL 2008
100
10
SQL 2005
90
9
SQL 2000
80
8


use master;
go

DECLARE @SQLVer varchar(10);
-- select the compatibility level based in sql server version
select @SQLVer = CASE  SUBSTRING(convert(varchar,SERVERPROPERTY('productversion')),1,2)
when 12 then '120'
when 11 then '110'
when 10 then '100'
when 9. then '90'
when 8. then '80'
end


DECLARE UserDatabases_CTE_Cursor Cursor
FOR

-- filer user database names from sysdatabases
select name as DatabaseName from sys.sysdatabases where ([dbid] > 4)

OPEN UserDatabases_CTE_Cursor
DECLARE @dbName varchar(100);
DECLARE @compatQuery varchar(500);

Fetch NEXT FROM UserDatabases_CTE_Cursor INTO @dbName
While (@@FETCH_STATUS <> -1)

BEGIN

-- set database compatibility level
set @compatQuery =  'ALTER DATABASE [' + @dbName + '] SET COMPATIBILITY_LEVEL = ' + @SQLVer


-- Execute compatability script
EXEC (@compatQuery)

-- Get next database
Fetch NEXT FROM UserDatabases_CTE_Cursor INTO @dbName
END

CLOSE UserDatabases_CTE_Cursor
DEALLOCATE UserDatabases_CTE_Cursor

GO

Tuesday, November 17, 2015

xp_cmdshell help; The configuration option 'xp_cmdshell' does not exist, or it may be an advanced option.


Msg 15281, Level 16, State 1, Procedure xp_cmdshell, Line 1
SQL Server blocked access to procedure 'sys.xp_cmdshell' of component 'xp_cmdshell' because this component is turned off as part of the security configuration for this server. A system administrator can enable the use of 'xp_cmdshell' by using sp_configure. For more information about enabling 'xp_cmdshell', see "Surface Area Configuration" in SQL Server Books Online.

Execute below statements to enable "xp_cmdshell" and 

EXEC sp_configure 'xp_cmdshell', 1  
GO  
RECONFIGURE  
GO


After executing above statements if you are facing below error

Msg 15123, Level 16, State 1, Procedure sp_configure, Line 51
The configuration option 'xp_cmdshell' does not exist, or it may be an advanced option.

Try below statements to enable advanced options  

EXEC sp_configure 'show advanced options', 1;  
GO  
RECONFIGURE;  
GO  
EXEC sp_configure 'xp_cmdshell', 1;  
GO  
RECONFIGURE;  
GO

Thursday, May 21, 2015

Difference between DateTime and DateTime2 DataType

DATETIME2 is the new data type introduced in SQL Server 2008

DATETIME2 provides more seconds precision & has larger date range, a larger default fractional precision. DATETIME is limited to 3 1/3 milliseconds, while DATETIME2 can be accurate down to 100ns

Advantages of DATETIME2
DATETIME2 has a date range of "0001 / 01 / 01" through "9999 / 12 / 31" while the DATETIME type only supports year 1753-9999
Larger range of values
Better Accuracy
Smaller storage space (if optional user-specified precision is specified)

Precision, scale
                                                                                                        0 to 7 digits, with an accuracy of 100nanoseconds.
                                                                                                        The default precision is 7 digits.
Storage Size
                                                                                                        6 bytes for precision less than 3
                                                                                                        7 bytes for precision 3 and 4.
All other precision require 8 bytes.
DATETIME2 with fractional seconds precision of 3 is same as DATETIME data type. And DATETIME2 (precision of 3) uses 7 bytes of storage instead of 8 byte

If you only need the date without time part use DATE
 If you only need the time without date part use TIME
 Using DATE & TIME data types instead of DATETIME2 in above situations you save the space

SQL Server Job history


Using below script you can fetch the specific job history like executing date and durations


select job_name, run_datetime, run_duration
from
(
    select job_name, run_datetime,
        SUBSTRING(run_duration, 1, 2) + ':' + SUBSTRING(run_duration, 3, 2) + ':' +
        SUBSTRING(run_duration, 5, 2) AS run_duration
    from
    (
        select DISTINCT
            j.name as job_name, 
            run_datetime = CONVERT(DATETIME, RTRIM(run_date)) +  
                (run_time * 9 + run_time % 10000 * 6 + run_time % 100 * 10) / 216e4,
            run_duration = RIGHT('000000' + CONVERT(varchar(6), run_duration), 6)
        from msdb..sysjobhistory h
        inner join msdb..sysjobs j
        on h.job_id = j.job_id
    ) t
) t
where job_name = 'Job name '
order by job_name, run_datetime

--- Query results are like below


SQL Script to Change the database to read only and read write


Below script is used to change the database into single user mode. To kill the current connections change the database to single user mode then change it to single user mode.Replace the database name from MyDATABASE to the database name need to change to READ ONLY

USE [master]
GO
ALTER DATABASE [MyDATABASE]  SET SINGLE_USER WITH ROLLBACK IMMEDIATE
GO
 ALTER DATABASE [MyDATABASE] SET READ_ONLY WITH NO_WAIT
GO
ALTER DATABASE [MyDATABASE] SET MULTI_USER
GO

Below script is used to change the database into read/write user mode.

 ALTER DATABASE [MyDATABASE] SET READ_WRITE WITH NO_WAIT

Rename the sql server database


There are couple of options are available to rename the database.
Option 1 :
 Rename the "MyDATABASE" to "MyDATABASE_NEW" using sp_renamedb command

 EXEC sp_renamedb 'MyDATABASE', 'MyDATABASE_NEW' 

Option 2:
 Rename the "MyDATABASE" to "MyDATABASE_NEW" using ALTER DATABASE Commnad

USE [master]
GO

ALTER DATABASE [MyDATABASE] SET SINGLE_USER WITH ROLLBACK IMMEDIATE
GO
ALTER DATABASE [MyDATABASE] MODIFY NAME = MyDATABASE_NEW
GO
ALTER DATABASE [MyDATABASE_NEW] SET MULTI_USER
GO

SQL Server installation methods


There are three types of Installation methods 
1. Local/Standard installation
2. Unattended installation 
3. Remote Installation 

Local/Standard installation
To perform standard installation you need to login into the machine and the login is part of local administrator group. 

Unattended installation 
It is also known as silent installation. Install multiple SQL Servers with identical configurations without using the interactive SQL Server setup is known as Unattended installation. 
Installation initiates from command prompt ( batch file will call setup file).
All the parameters are saved in configuration file (setup.exe) 

An unattended installation using a configuration file using the following command line at a new command prompt.
D:\SQLFULL_x86_ENU\Setup.exe /ConfigurationFile=D:\SQLFULL_x86_ENU\SQLConfigurationFile.ini


Remote Installation
You can install SQL Server from remote machine also. 
To perform remote installation the user account should have following permissions 
1. Have administrative rights on the remote computer. 
2. Have read access to the setup source files folder.


Error messages when restoring from different versions of SQL Server.

We can't restore the backups taken in Newer version of SQL Server instance on older version of SQL Server. 

SQL Server 2008 R2 to SQL Server 2008
Msg 3169, Level 16, State 1, Line 1
The database was backed up on a server running version 10.50.1600. That version is incompatible with this server, which is running version 10.00.1600. Either restore the database on a server that supports the backup, or use a backup that is compatible with this server.
Msg 3013, Level 16, State 1, Line 1
RESTORE DATABASE is terminating abnormally.


SQL Server 2008 R2 to SQL Server 2005
Server: Msg 3241, Level 16, State 7, Line 1
The media family on device 'f:\temp\test001_sql2008r2.bak' is incorrectly formed. SQL Server cannot process this media family.
Server: Msg 3013, Level 16, State 1, Line 1
RESTORE DATABASE is terminating abnormally.


SQL Server 2008 R2 to SQL Server 2000
Server: Msg 3169, Level 16, State 1, Line 1
The backed-up database has on-disk structure version 661. The server supports version 539 and cannot restore or upgrade this database.
Server: Msg 3013, Level 16, State 1, Line 1
RESTORE DATABASE is terminating abnormally.


SQL Server 2008 to SQL Server 2005
Server: Msg 3241, Level 16, State 7, Line 1
The media family on device 'f:\temp\test001_sql2008.bak' is incorrectly formed. SQL Server cannot process this media family.
Server: Msg 3013, Level 16, State 1, Line 1
RESTORE DATABASE is terminating abnormally.


SQL Server 2008 to SQL Server 2000
Server: Msg 3169, Level 16, State 1, Line 1
The backed-up database has on-disk structure version 655. The server supports version 539 and cannot restore or upgrade this database.
Server: Msg 3013, Level 16, State 1, Line 1
RESTORE DATABASE is terminating abnormally.


SQL Server 2005 to SQL Server 2000
Server: Msg 3169, Level 16, State 1, Line 1
The backed-up database has on-disk structure version 611. The server supports version 539 and cannot restore or upgrade this database.
Server: Msg 3013, Level 16, State 1, Line 1
RESTORE DATABASE is terminating abnormally.


TDSSNIClient initialization failed with error 0x80092004, status code 0x1. Reason: Initialization failed with an infrastructure error. Check for previous errors. Cannot find object or property.


2015-02-17 12:27:38.19 spid15s     Error: 26014, Severity: 16, State: 1.
2015-02-17 12:27:38.19 spid15s     Unable to load user-specified certificate [Cert Hash(sha1) "5B4FF9FFF4E6752A3AD51489E1A9C455E580BCC3"]. The server will not accept a connection. You should verify that the certificate is correctly installed. See "Configuring Certificate for Use by SSL" in Books Online.
2015-02-17 12:27:38.19 spid15s     Error: 17182, Severity: 16, State: 1.
2015-02-17 12:27:38.19 spid15s     TDSSNIClient initialization failed with error 0x80092004, status code 0x80. Reason: Unable to initialize SSL support. Cannot find object or property. 
2015-02-17 12:27:38.19 spid15s     Error: 17182, Severity: 16, State: 1.
2015-02-17 12:27:38.19 spid15s     TDSSNIClient initialization failed with error 0x80092004, status code 0x1. Reason: Initialization failed with an infrastructure error. Check for previous errors. Cannot find object or property. 
2015-02-17 12:27:38.19 spid15s     Error: 17826, Severity: 18, State: 3.
2015-02-17 12:27:38.19 spid15s     Could not start the network library because of an internal error in the network library. To determine the cause, review the errors immediately preceding this one in the error log.
2015-02-17 12:27:38.19 spid15s     Error: 17120, Severity: 16, State: 1.
2015-02-17 12:27:38.19 spid15s     SQL Server could not spawn FRunCommunicationsManager thread. Check the SQL Server error log and the Windows event logs for information about possible related problems.
Event ID 17182: TDSSNIClient initialization failed with error 0x7e, status code 0x3a.

Event ID 17826: Could not start the network library because of an internal error in the network library. To determine the cause, review the errors immediately preceding this one in the error log.

Event ID 17120: SQL Server could not spawn FRunCM thread. Check the SQL Server error log and the Windows event logs for information about possible related problems.

Solution :

1. Check 'Forced Encryption' (Turned False) and 'Certificate' value is cleared under SQL Server Configuration Manager.
2> Check the following registry key 
HKEY_LOCAL_MACHINE\SOFTWARE\Microsoft\Microsoft SQL Server\MSSQL10.SQL2008\MSSQLServer\SuperSocketNetLib\Certificate
and clear the Certificate values.


Wednesday, May 6, 2015

PDW Database Restore

Using below command you find the backup header information for all backup sets on a given backup devise

Restore headeronly from disk = '\\10.10.10.10\PDWBackups\FullBackup_02052015\DWLOADER_staging'


Restore a database using Full backup 

Restore database DBAAdmin from disk = '\\10.10.10.10\PDWBackups\FULL\05052015\AdventureWorksPDW2012.bak'


Restore a database using differential backup 

Restore Database DBAAdmin1 from disk = '\\10.10.10.10\PDWBackups\FULL\05052015\AdventureWorksPDW2012_Diff.bak' 
with BASE = '\\10.10.10.10\PDWBackups\FULL\05052015\AdventureWorksPDW2012.bak'  
 
In above statement full backup is '\\10.10.10.10\PDWBackups\FULL\05052015\AdventureWorksPDW2012.bak'  

and differential backup is \\10.10.10.10\PDWBackups\FULL\05052015\AdventureWorksPDW2012_Diff.bak' 


Limitations in the restoration is 

The backup set can only be restored to a SQL Server PDW destination appliance that has the same number or more Compute nodes than the source appliance. It cannot have fewer Compute nodes than the source appliance.

Sunday, May 3, 2015

How to connect PDW


You can login pdw using MS Visual Studio 2012/SQL Data Tools  or Nexus Query Chameleon


Lets try using Visual Studio 2012 

Goto Visual Studio 2012 icon and click 


Click on Run the program without getting help

you can see 


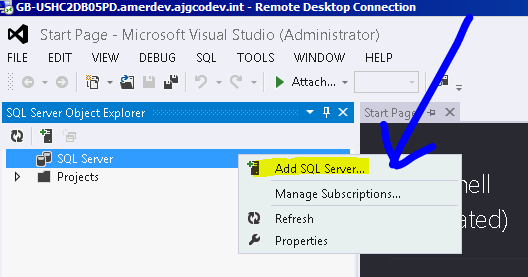
Click on View and select SQL Server Object Explorer 


now you can see below screen right click on the SQL Server 


Select Add SQL Server 


Provide the PDW server and Login & password details ( you can login using SQL Authentication or using Windows Authentication) 

and click on connect 

How to grant access on backup shared in PDW


How to grant access on backup shared in PDW

To backup the database we have to assign access permissions to a windows account that has write access to a file share on a target server.
sp_pdw_add_network_credentials '10.10.10.10','corp\adAcctLogin', 'PassWord'

To remove access to shared path  
sp_pdw_add_network_credentials '10.10.10.10','corp\adAcctLogin', 'PassWord'

To check who are all having permissions 
select * from sys.dm_pdw_network_credentials


What is Trace Flag? Enable / Disabling Trace Flag

Trace flag is a directive used to " set specific server characteristics or switch off a perticular behavious" -- is a setting that in some way or another alter the behaviour of various SQL Server functions

Trace flags are used to generate internal information regarding SQL Server's activities, primarily so that Microsoft developers can troubleshoot their code.

Trace flags are enbled in SESSION or GLOBAL levels

How to check whcih trace flags are enabled in the server globally

DBCC  TRACESTATUS(-1) 

Above command will display the status of all trace flags that are currently enabled globally.

How to check whcih trace flags are enabled in the server for current session

DBCC  TRACESTATUS()

Above command will display the list of all trace flags that are enabled for the current session 

You can enable/implement Trace Flags in several ways

  • using SQL Server Configuration Manager
  • using Registry Editor
  • using Query Analyser
Implementing Trace Flag using SQL Configuration Manager 

This is also know as Enabling Trace Flag using –T Startup Option
Adding trace flag in Startup Parameters 

-T startup option to specify that the trace flag be set on during startup. Saparate each trace flag by semi-colon(;). -T startup option enables a trace flag globally 

You can't enable a session level trace flag  by using start up option


Implementing Trace Flags using Registry (REGEDIT.MSC)

This is not a recomended method. please avoid using it in production box.
  • Goto Run and type regedit.msc and press endter
  • Goto below location in registry
  • HKEY_LOCAL_MACHINE\SOFTWARE\Microsoft\Microsoft SQL Server\MSSQL10.SQL2008\MSSQLServer\Parameters
  • Add the trace flag by right click on the Parameters folder and click on New and then String Value
  • Provide the name as SQLArg3 and then right click on the key value to modify the value.
  • Now provide the value as -T1222 


Implementing Trace Flags using Query Analyser 
Using DBCC TRACEON command you can enable the trace flags.All trace flags can't be enabled using DBCC TRACEON e.g. DBCC TRACEON (835), this can be enabled during the server startup only.

You can enable Session Scope or Global Scope using this command

Session Scope : Using below command we can enable session level trace flag

DBCC TRACEON(1222)

Global Scope :  Using below command we can enable global level trace flag

DBCC TRACEON(1222,-1)

Disabling Trace flag

Remove from start-up parameters 
  • Go to SQL Server configuration manager and to sql server properties 
  • Go to Advanced Tab and click on drop box of start-up parameter and remove the parameter -T1222
  • Restart SQL Server services 
Remove from Registry 
  • Go to regedit.exe and 
  • Browse HKEY_LOCAL_MACHINE\SOFTWARE\Microsoft\Microsoft SQL Server\MSSQL10.SQL2008\MSSQLServer\Parameters
  • Remove the string value which has -T1222
  • Restart the SQL Server services 

Remove using Query Analyser 

use below command to turn off session level trace flag

DBCC TRACEOFF(1222)

use below command to turn off global level trace flag

DBCC TRACEOFF(1222,-1)


Caution : 
Do not use trace flags in production environment without testing it on non production environments, trace flags should be used under the guidance of Microsoft SQL Server support.


Friday, April 10, 2015

Table Space used and row count


Using below query you can find out the table space in a database and rows count of the table. 

Please change/add your tables list in WHERE condition  


SELECT T.NAME AS TableName, P.rows AS RowCounts, SUM(a.total_pages) * 8 AS TotalSpaceKB,  SUM(a.used_pages) * 8 AS UsedSpaceKB, (SUM(a.total_pages) - SUM(a.used_pages)) * 8 AS UnusedSpaceKB 
 FROM  sys.tables T
 INNER JOIN      
    sys.indexes I ON t.OBJECT_ID = i.object_id
 INNER JOIN 
    sys.partitions P ON i.object_id = p.OBJECT_ID AND i.index_id = p.index_id
 INNER JOIN 
    sys.allocation_units A ON p.partition_id = a.container_id
 LEFT OUTER JOIN 
    sys.schemas S ON t.schema_id = s.schema_id
 WHERE 
    T.NAME in ('Table1','Table2','Table3','Table4') 
    AND T.is_ms_shipped = 0
    AND I.OBJECT_ID > 255 
 GROUP BY 
    T.Name, S.Name, P.Rows
 ORDER BY 
    T.Name

 you can find using SSMS as shown in below. Right click on the database and click on the Reports --> select Standard Reports --> and select Disk Usage by Table. 


and results shown like below

Monday, November 24, 2014

How to Find a SQL Server Database Object in entire sql server


Script to find the weather an object is exist in entire sql server or not, if yes in which database it is exit. Below is the  better why to find a SQL Server object, such as a table, a procedure, or a trigger, would be to query the sysobjects system table in each and every  local database. Using below query we are searching for UdfUserAccessLevel


Declare @SqlStmt nvarchar(500)


/* drop the temporary -tblTempDBObjects table if already exists which store all objects information */
If Object_Id('tempdb..#tblTempDBObjects') is Not Null
Drop table #tblTempDBObjects
/* create temporary tblTempDBObjects table in temp db*/
Create TABLE tempdb..#tblTempDBObjects (
dbName sysname,
objName varchar(250),
objtype char(2)
)


/*assign string value of sql statement to insert all objects to variable */
Select @SqlStmt = 'sp_msforeachdb ''Insert tempdb..#tblTempDBObjects select ''''?'''' as DBName, name, xtype From ?..sysobjects'''

Exec sp_executesql @SqlStmt
/* searching for equired oj=bject in temptable --- UdfUserAccessLevel */
Select * From tempdb..#tblTempDBObjects Where objName like '%UdfUserAccessLevel%'
RETURN

Above statement will give below resultset and it contain database name, object and object type.

Thursday, October 30, 2014

How to copy non-clustered indexes to subscriber in snapshot replication


In snapshot replication by default Non-cluster indexes are not copied to subscriber below is the work around for copying Non-cluster indexes to subscriber in Snapshot replication.

Step 1:
  - Login into the Publisher server
  -  Expand the Replication folder and Local Publications
  -  Right click on the publisher and select properties


Step 2:
                In Publication Properties window select Articles Tab à Select the Article Properties
               

Step 3:
  -  In Popup select Set Properties of All Table articles to copy all objects Non-Cluster indexes
  -  Select Set Properties of Highlighted table article to change the option to copy Non-cluster indexes of specific table


Step 4: 

                In Properties for All Tables Articles window change the below highlighted property from False to True.
               

In next run of snapshot will copy all noncluster indexes to subscriber.

Saturday, October 25, 2014

Validate all views in the database


There is an sp that validates the metadata and the   same sp we can use to validate

set nocount on
select ' print ''' +name +'''
exec sp_refreshview ['+name+']' + CHAR(10)+ '
go '
from sys.views


Execute  the above script it will give script to run sp_refreshview on all views. Run the scripts generated using above sql statement I will give error link below screen


Thursday, October 16, 2014

DBCC CHECKIDENT


-- Create Table Script to test CHECKIDENT

CREATE TABLE DBCC_ReSeed
( ID INT IDENTITY(1,1) NOT NULL,
DateAdded DATETIME NOT NULL )

-- Inserting values to DBCC_ReSeed table
INSERT INTO DBCC_ReSeed(DateAdded) VALUES(GETDATE())

SELECT * FROM DBCC_ReSeed

--- Check the current value which produces the below output… 
DBCC CHECKIDENT ('DBCC_ReSeed', NORESEED)

---  Output like :  Checking identity information: current identity value '5', current column value '5'.
--- Now reset the identity value to 20 so that the next time when we insert data into DBCC_RdSeed table , the value will be 21…

DBCC CHECKIDENT('DBCC_ReSeed', RESEED, 20)

----- Output like :   Checking identity information: current identity value '5', current column value '20'


--  Add another row and check identity value. The row inserted will have a value of 21… 

INSERT INTO DBCC_ReSeed (DateAdded)  VALUES(GETDATE());

SELECT * FROM DBCC_ReSeed


-- Delete data in table and reset to start from 1

DELETE FROM DBCC_ReSeed

DBCC CHECKIDENT('DBCC_ReSeed')
-- After deleting data identity value didn’t reset and the value will be remain same  
---  Output like :  Checking identity information: current identity value '20', current column value '20'.


DBCC CHECKIDENT('DBCC_ReSeed', RESEED, -1)

---  Output like :  Checking identity information: current identity value '21', current column value '-1'.


INSERT INTO DBCC_ReSeed (DateAdded)  VALUES(GETDATE());

SELECT * FROM DBCC_ReSeed


Monday, August 11, 2014

change server level collation for a SQL Server Instance

Collations specify the rules for how strings of character data are sorted and compared, based on the norms of particular languages and locales


The server collation acts as the default collation for all system databases that are installed with the instance of SQL Server, and also any newly created user databases. The server collation is specified during SQL Server installation.  It is not mandatory that we change the default server level collation, because you can specify a different collation level when you create users databases, but you need to remember to specify this when creating user databases.

To change the default SQL Server collation you can simply rebuild the system databases. When you rebuild the master, the model, msdb and tempdb system database are actually dropped and recreated in their original location. If a new collation is specified in the rebuild statement the system databases are rebuilt using that collation setting. Any user modifications to these databases will be lost, so it is important to backup any of this information you wish to retain

Step 1

First check the existing SQL Server collation setting of your instance. Run the command below to get the collation value of your SQL Server instance.
SELECT SERVERPROPERTY('Collation')
Step 2
Make sure to record all server level settings before rebuilding the system databases to ensure that you can restore the system databases to their current settings.  


Step 3

Take backup of all user and server databases.

Take the backup of all jobs, maintenance plans, logins and their access levels
To take all jobs backup in OBJECT EXPLORER window select job folder & in right side OBJECT EXPLORE DETAIL window it displays all jobs, select all jobs and right click on your selection then choose the SCRIPT AS option to create the script for all jobs.

Next is to secure your logins, passwords and their access levels. You can use sp_help_revlogin stored procedure to create a script for all logins so they can be recreated easily. And take server level permissions using script

Step 4

Detach all user databases before rebuilding your system databases. If you leave databases attached they will be detached and will be found in the database folder.

Step 5

Now its time to rebuild your system databases. This operation will recreate your master database and all existing settings will be reset. Run the below command from a Windows command prompt. Make sure to run this command from the directory where you have placed your SQL Server setup files. Once you press enter, a separate window will appear to show you the progress bar. Once the rebuild is done, that window will disappear.

Setup /QUIET /ACTION=REBUILDDATABASE /INSTANCENAME=MANVENDRA /SQLSYSADMINACCOUNTS=domain\adminUser /SAPWD= SaPWD@SqlRebuild /SQLCOLLATION=SQL_Latin1_General_CP1_CI_AI

* SQL_Latin1_General_CP1_CI_AI –this is the new collation need to change

Once the rebuild operation is complete, check the server collation to verify whether this change is successful or not. As we can see in the screenshot below, the server collation has changed to SQL_Latin1_General_CP1_CI_AI. At this point we cannot restore any of the system databases, because doing so will revert back to the previous collation setting. So we will need to use the scripts that were created to recreate logins, jobs

Step 6

Attach all user databases which were detached in Step 4.

Step 7

Now change the collation settings of all user databases. It's not necessary to change the collation settings for the user databases, it totally depends on your requirement.

Run the commands below to change the collation settings of your user databases.

ALTER DATABASE CollationChangeDBName collate SQL_Latin1_General_CP1_CI_AI
Sometimes the command fails to execute and you get this error:

Msg 5075, Level 16, State 1, Line 1 The object 'PK_xxxx' is dependent on database collation. The database collation cannot be changed if a schema-bound object depends on it. Remove the dependencies on the database collation and then retry the operation.
In that case you may need to export all data and recreate the database with the new collation settings.

Step 8

Now run all of the scripts which were created in Step 3 to restore jobs, alerts, logins, operators, etc...  Also don't forget to change the server level configuration settings which were captured in Step 2.

Now your instance is ready to use the new server level collation.

Cannot access the specified path or file on the server. Verify that you have the necessary security privileges and that the path or file exists

If you received below error while attaching a .mdf file in cluster environment please follow below steps to resolve the issue ERROR Ca...