Tuesday, December 9, 2014

Migrating SQL Server 2005 DTSX Packages to SQL Server 2012

Migrating SQL Server 2005 DTSX Packages to SQL Server 2012

Login into the SSMS of sql server 2005 Expand the Management à Legacy à Data Transfarmation Services tab in object explorer shown as below pic it displayes all the dtsx packages located in source server i.e. SQL Server 2005


Right click on Data Transfarmation Services and select Migration Wizard

In Package Migration Wizard – Choose Source Location Screen the source as Microsoft SQL Server and give the server name and select the authentication mode(either windows authentication or SQL Server authentication) .  And click on Next button


Next  screen In Package Migration Wizard – Choose Destination Location, select the destination as DTSX File specify the Folder name where you saving  these packages. And click on Next


Next  screen In Package Migration Wizard – List Packages, here select the DTSX Packages to you want to migrate. And click Next


Next  screen In Package Migration Wizard – Specify a Log file, give the path and log file name, it will log all migration information. And click Next

Next  screen In Package Migration Wizard – Complete the Wizard, This will provide the summary of migration. Finally click on Finish.

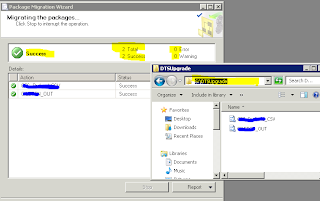
Next  screen In Package Migration Wizard – Migration the Packages, Last screen indication what are the packages migration any errors/warnings given information.
And you can find the DTSX files which are selected to migrate in Destination folder shown in  above image. And copy the DTSX package files into destination server i.e SQL Server 2012


Login into the Destination server i.e. SQL Server 2012  . select Project Conversion Wizard from program files    

It will start Integration Services Project Conversion Wizard click Next on initial screen
In Locate Package screen select the Source as File System and give files location copied from SQL Server 2005 in Folder.  And click on Next


It will display the list of all available DTSX packages in the folder. Select the packages which you want to migrate. Shown as in below screen. And Click on Next


It will ask the Path and Project Name to store upgraded packages as ispac (Integration Services Project Deployment File)  format. Click Next till Review Screen.


Click on Convert button in Review & click on close button in success screen, it creates DTSUpgrate2005.ispac in above mentioned output path.


Select the Deployment Wizard in Integration Services

In Integration Deployment Wizard – Select Source Screen Select Project Deployment file radio button and in path section give the .ispac file location to deploy all dtsx package files

In Integration Deployment Wizard – Select Destination screen Enter the destination server name in Server name and select the path by clicking Browse button.


Click next and click Deploy in Review screen.


It will create dtsx files in Integration Services Catelogs à SSISDB à your prject name folder


Note  :If any DTSX package file will have any deprecated task or files used while converting you will get the errors.

Monday, November 24, 2014

SQL Server Latest service packs


Product Version
Latest Service Pack
SQL Server 2014
n/a
SQL Server 2012


SQL Server 2008 R2
SQL Server 2008
SQL Server 2005
SQL Server 2000

How to Find a SQL Server Database Object in entire sql server


Script to find the weather an object is exist in entire sql server or not, if yes in which database it is exit. Below is the  better why to find a SQL Server object, such as a table, a procedure, or a trigger, would be to query the sysobjects system table in each and every  local database. Using below query we are searching for UdfUserAccessLevel


Declare @SqlStmt nvarchar(500)


/* drop the temporary -tblTempDBObjects table if already exists which store all objects information */
If Object_Id('tempdb..#tblTempDBObjects') is Not Null
Drop table #tblTempDBObjects
/* create temporary tblTempDBObjects table in temp db*/
Create TABLE tempdb..#tblTempDBObjects (
dbName sysname,
objName varchar(250),
objtype char(2)
)


/*assign string value of sql statement to insert all objects to variable */
Select @SqlStmt = 'sp_msforeachdb ''Insert tempdb..#tblTempDBObjects select ''''?'''' as DBName, name, xtype From ?..sysobjects'''

Exec sp_executesql @SqlStmt
/* searching for equired oj=bject in temptable --- UdfUserAccessLevel */
Select * From tempdb..#tblTempDBObjects Where objName like '%UdfUserAccessLevel%'
RETURN

Above statement will give below resultset and it contain database name, object and object type.

Sunday, November 23, 2014

Move Master & Resource databases in SQL Server 2005

Move Master & Resource databases in SQL Server 2005
The Resource database depends on the location of the master database. The Resource data and log files must reside together and must be in the same location as the master data file (master.mdf). Therefore, if you move the master database, you must also move the Resource database to the same location as the master data file. Do not put the Resource database in either compressed or encrypted NTFS file system folders. Doing so will hinder performance and prevent upgrades. To move the master and Resource databases, follow these steps.
From the Start menu, point to All Programs, point to Microsoft SQL Server 2005, point to Configuration Tools, and then click SQL Server Configuration Manager.
In the SQL Server 2005 Services node, right-click the instance of SQL Server (for example, SQL Server (MSSQLSERVER)) and choose Properties.
In the SQL Server (instance_name) Properties dialog box, click the Advanced tab.
Edit the Startup Parameters values to point to the planned location for the master database data and log files, and click OK. Moving the error log file is optional.
The parameter value for the data file must follow the -d parameter and the value for the log file must follow the -l parameter. The following example shows the parameter values for the default location of the master data and log files.
-dC:\Program Files\Microsoft SQL Server\MSSQL.1\MSSQL\DATA\master.mdf;-eC:\Program Files\Microsoft SQL Server\MSSQL.1\MSSQL\LOG\ERRORLOG;-lC:\Program Files\Microsoft SQL Server\MSSQL.1\MSSQL\DATA\mastlog.ldf
If the planned relocation for the master data and log files is E:\SQLData, the parameter values would be changed as follows:
-dE:\SQLData\master.mdf;-eC:\Program Files\Microsoft SQL Server\MSSQL.1\MSSQL\LOG\ERRORLOG;-lE:\SQLData\mastlog.ldf
Stop the instance of SQL Server by right-clicking the instance name and choosing Stop.
Move the master.mdf and mastlog.ldf files to the new location.
Start the instance of SQL Server in master-only recovery mode by entering one of the following commands at the command prompt. The parameters specified in these commands are case sensitive. The commands fail when the parameters are not specified as shown.
For the default (MSSQLSERVER) instance, run the following command.
NET START MSSQLSERVER /f /T3608
For a named instance, run the following command.
NET START MSSQL$instancename /f /T3608
Using sqlcmd commands or SQL Server Management Studio, run the following statements. Change the FILENAME path to match the new location of the master data file. Do not change the name of the database or the file names.
ALTER DATABASE mssqlsystemresource
    MODIFY FILE (NAME=data, FILENAME= 'new_path_of_master\mssqlsystemresource.mdf');
GO
ALTER DATABASE mssqlsystemresource
    MODIFY FILE (NAME=log, FILENAME= 'new_path_of_master\mssqlsystemresource.ldf');
GO
Move the mssqlsystemresource.mdf and mssqlsystemresource.ldf files to the new location.
Set the Resource database to read-only by running the following statement.
ALTER DATABASE mssqlsystemresource SET READ_ONLY;
Exit the sqlcmd utility or SQL Server Management Studio.
Stop the instance of SQL Server.
Restart the instance of SQL Server.
Verify the file change for the master database by running the following query. The Resource database metadata cannot be viewed by using the system catalog views or system tables.
SELECT name, physical_name AS CurrentLocation, state_desc
FROM sys.master_files
WHERE database_id = DB_ID('master');
GO
Moving the tempdb database
tempdb is re-created each time the instance of SQL Server is started, you do not have to physically move the data and log files. The files are created in the new location when the service is restarted in step 3. Until the service is restarted, tempdb continues to use the data and log files in existing location.
Determine the logical file names of the tempdb database and their current location on the disk.
SELECT name, physical_name AS CurrentLocation
FROM sys.master_files
WHERE database_id = DB_ID(N'tempdb');
GO
Change the location of each file by using ALTER DATABASE.
USE master;
GO
ALTER DATABASE tempdb
MODIFY FILE (NAME = tempdev, FILENAME = 'E:\SQLData\tempdb.mdf');
GO
ALTER DATABASE tempdb
MODIFY FILE (NAME = templog, FILENAME = 'F:\SQLLog\templog.ldf');
GO
Stop and restart the instance of SQL Server.
Verify the file change.
SELECT name, physical_name AS CurrentLocation, state_desc
FROM sys.master_files
WHERE database_id = DB_ID(N'tempdb');
Delete the tempdb.mdf and templog.ldf files from the original location.

Thursday, November 20, 2014

Lock Pages in Memory

Lock Pages in Memory

It is a standard configuration setting for SQL Server.  Some times Server forced to page out large quantities of memory because of memory pressure  from windows then immediately for some time SQL Server performance will decreased. By enabling Lock Pages in Memory  SQL Server ignores the request from windows to release memroy(RAM sucn as data cache). This problem occurs much less in SQL Server instances running under SQL Server 2008.


Every time SQL Server try to fetch data pages from memory instead of fetching for Disk to reduce the disk I/O.  With this behaviour SQL Server performance will increase.

The Lock Pages in Memory option is set to OFF by default in SQL Server. If you have system administrator permissions, you can enable the option manually by using the Windows Group Policy tool (gpedit.msc) and assign this permission to the account that SQL Server is running.


Below are the steps to enable Lock Pages in Memory.
è  Click on start button click on Run. In open box type   gpedit.msc and lick on OK button. It will open Local Group Policy Editor Console Window.
 è  On the Local Group Policy Editor console, expand Computer Configuration, then expand Windows Settings, then  expand Security Settings, then expand Local Policies. In Local Policies Select User Rights Assignments folder. In the right side pane it will display all policies information. In the right side pane you can find the Lock pages in memory option. Double click on it
è  
è  It displays below screen, click on Add User or Group and in = Select USERS, SERVICE ACCOUNTS or GROUPS  dialog box add account of SQL Server service Run as account which is administrator permission
è 


RAID

RAID : Redundant Array of Inexpensive Disks.
It is used to provide fault tolerance to database servers.  There are six RAID levels from 0 - 5. RAIDs will allow you to treat multiple hard drives as a single volume on your computer.

For SQL Server RAID 1+0 is the best one. If it is expensive RIAD 1 or 1+0 for log files 5 for data files and 10 for tempdb.  RAID 5 is not suitable for log file drives because there are huse writes on the files. RAID 1+0 provides better write performance than any other RAID level providing . So always plays log files on RAID (1+0) disk which provides better performance from hardware failures and better write performance.
Performance may benefits if TEMPDB is place on RAID 1+0
RAID 0 (Disk Striping) :It improve the read and write performance by spreading the operations into multiple disks. It is similar to RAID 5 but it wont provides fault tolerance 
RAID 1 (Disk Mirroring) : Disk mirror provides a redundant, identical copy of a selected disk. All data written into the primary disk is written into the mirror disk. RAID 1 provides the fault tolerance and generally improves the read performance but degrades write performance
RAID 2  : It adds redundancy by using an error correction method that spreads across all disks. It is not as efficient as other RAID levels and not generally used.
RAID 3  (Byte Striping) : It uses the striping method as RAID2, but error correcting method requires only one disk, it uses one drive on the array to store parity data (Parity data is used by some RAID levels to achieve redundancy. If a drive in the array fails, remaining data on the other drives can be combined with the parity data (using the Boolean XOR function) to reconstruct the missing data)
RAID 4 This level uses striped data in much larger blocks or segments than RAID 2 or RAID 3. Like RAID 3, the error correction method requires only one disk for parity data. This feature keeps user data separate from error-correction data. RAID 4 is not as efficient as other RAID levels and is not generally used.
RAID 5 (Parity Striping) : It is also known as parity with striping, in this level strips the data into large blocks across the disk in array. It writes the parity across all the disks. Data redundancy is provided by parity information.  Read data transactions are very fast while write data transaction are somewhat slower.  In the event of a single drive failure, data can still be accessed. A minimum of three drives is required.  
RAID 1+0 (Mirror of Strips) :  It is also known as mirror with striping. It uses the stripped array of disks that are then mirrored to another identical set of stripped disks. For example, a striped array can be created by using five disks. The striped array of disks is then mirrored using another set of five striped disks. RAID 10 provides the performance benefits of disk striping with the disk redundancy of mirroring. RAID 10 provides the highest read-and-write performance of any one of the other RAID levels, but at the expense of using two times as many disks


Monday, November 3, 2014

Identify if a disk is a local or SAN in Window 2008


Using below steps  you can identify what are the local disks and SAN disks in Window 2008

Click on Startà Administrative Tools à Select Server Manager


It will display below screen


In Above screen slect Diagnostics à select Device Manager  à Expand the Disk Drives  in the right side pane


Anything which is SAN attached will be prefixed with "Multi-Path Disk device". And all other dives are local

To find the volumes associated with the disks follow below steps
Right click on the below disk and Volumes tab and click on Populate button


Below Screen display the associated drives information


Thursday, October 30, 2014

How to copy non-clustered indexes to subscriber in snapshot replication


In snapshot replication by default Non-cluster indexes are not copied to subscriber below is the work around for copying Non-cluster indexes to subscriber in Snapshot replication.

Step 1:
  - Login into the Publisher server
  -  Expand the Replication folder and Local Publications
  -  Right click on the publisher and select properties


Step 2:
                In Publication Properties window select Articles Tab à Select the Article Properties
               

Step 3:
  -  In Popup select Set Properties of All Table articles to copy all objects Non-Cluster indexes
  -  Select Set Properties of Highlighted table article to change the option to copy Non-cluster indexes of specific table


Step 4: 

                In Properties for All Tables Articles window change the below highlighted property from False to True.
               

In next run of snapshot will copy all noncluster indexes to subscriber.

Saturday, October 25, 2014

Validate all views in the database


There is an sp that validates the metadata and the   same sp we can use to validate

set nocount on
select ' print ''' +name +'''
exec sp_refreshview ['+name+']' + CHAR(10)+ '
go '
from sys.views


Execute  the above script it will give script to run sp_refreshview on all views. Run the scripts generated using above sql statement I will give error link below screen


Tuesday, October 21, 2014

SQL Server and Build Numbers


Build chart lists all of the known Service Packs (SP)

RTM
SP1
SP2
SP3
SP4
SQL Server 2014
12.0.2000.8 12.00.2000.8


SQL Server 2012
11.0.2100.60 11.00.2100.60
11.0.3000.0
or 11.1.3000.0
11.0.5058.0
or 11.2.5058.0


SQL Server 2008 R2
10.50.1600.1
10.50.2500.0/
10.51.2500.0
10.50.4000.0/ 10.52.4000.0
10.50.6000.34/ 10.53.6000.34

SQL Server 2008
10.0.1600.22 10.00.1600.22
10.0.2531.0 10.00.2531.0
or 10.1.2531.0
10.0.4000.0 10.00.4000.0/
10.2.4000.0
10.0.5500.0 10.00.5500.0/ 10.3.5500.0
10.0.6000.29 10.00.6000.29/ 10.4.6000.29

SQL Server 2005
9.0.1399.06 9.00.1399.06
9.0.2047/9.00.2047
9.0.3042/ 9.00.3042
9.0.4035/ 9.00.4035
9.0.5000/ 9.00.5000
SQL Server 2000
8.0.194 8.00.194
8.0.384 8.00.384
8.0.532 8.00.532
8.0.760/ 8.00.760
8.0.2039 8.00.2039
SQL Server 7.0
7.0.623 7.00.623
7.0.699 7.00.699
7.0.842 7.00.842
7.0.961 7.00.961

Thursday, October 16, 2014

DBCC CHECKIDENT


-- Create Table Script to test CHECKIDENT

CREATE TABLE DBCC_ReSeed
( ID INT IDENTITY(1,1) NOT NULL,
DateAdded DATETIME NOT NULL )

-- Inserting values to DBCC_ReSeed table
INSERT INTO DBCC_ReSeed(DateAdded) VALUES(GETDATE())

SELECT * FROM DBCC_ReSeed

--- Check the current value which produces the below output… 
DBCC CHECKIDENT ('DBCC_ReSeed', NORESEED)

---  Output like :  Checking identity information: current identity value '5', current column value '5'.
--- Now reset the identity value to 20 so that the next time when we insert data into DBCC_RdSeed table , the value will be 21…

DBCC CHECKIDENT('DBCC_ReSeed', RESEED, 20)

----- Output like :   Checking identity information: current identity value '5', current column value '20'


--  Add another row and check identity value. The row inserted will have a value of 21… 

INSERT INTO DBCC_ReSeed (DateAdded)  VALUES(GETDATE());

SELECT * FROM DBCC_ReSeed


-- Delete data in table and reset to start from 1

DELETE FROM DBCC_ReSeed

DBCC CHECKIDENT('DBCC_ReSeed')
-- After deleting data identity value didn’t reset and the value will be remain same  
---  Output like :  Checking identity information: current identity value '20', current column value '20'.


DBCC CHECKIDENT('DBCC_ReSeed', RESEED, -1)

---  Output like :  Checking identity information: current identity value '21', current column value '-1'.


INSERT INTO DBCC_ReSeed (DateAdded)  VALUES(GETDATE());

SELECT * FROM DBCC_ReSeed


Cannot access the specified path or file on the server. Verify that you have the necessary security privileges and that the path or file exists

If you received below error while attaching a .mdf file in cluster environment please follow below steps to resolve the issue ERROR Ca...